In Todays Episode we will learn how to use google fonts in WordPress. When it comes to web design, fonts are like the clothing of your website—they can make a statement, set the mood, and leave a lasting impression. If you’re a WordPress user looking to elevate your site’s appearance, you’re in luck. You can tap into the wonderful world of Google Fonts to bring an extra dose of style and uniqueness to your online space.
Google Fonts offers a treasure trove of typefaces that can make your content visually appealing and easy to read. Whether you’re running a blog, an online store, or a portfolio site, choosing the right font can be a game-changer.
In this guide, we’ll walk you through the simple steps of integrating Google Fonts into your WordPress website. Don’t worry; it’s not as techy as it might sound! You’ll learn how to pick the perfect fonts, apply them to your site with a bit of code or using plugins, and give your website a fresh and distinctive look.
So, let’s get started on this journey to spruce up your WordPress site’s typography and make it truly yours with Google Fonts. Your website is about to look better than ever!
To use Google Fonts in WordPress, you can follow these steps:
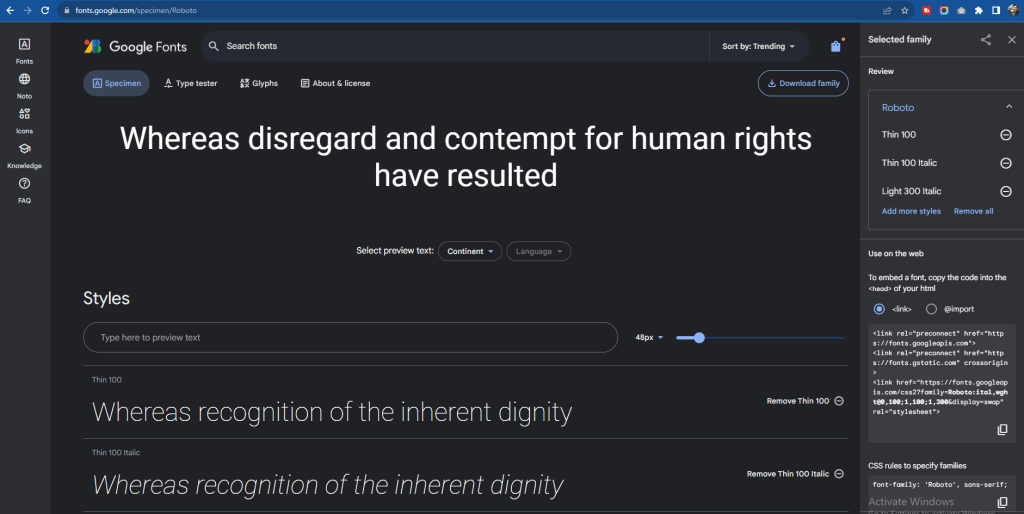
- Choose a Google Font: Visit the Google Fonts website and select the font(s) you want to use on your WordPress website. You can search for fonts, filter by categories, and customize the font styles.
- Select Font Styles: After selecting a font, you can customize its styles, such as weight (normal, bold, etc.), style (italic, regular, etc.), and character sets. Make sure to note down the font styles you want to use.

Next, log in to your WordPress dashboard and inside Appearance go to Editor and open up your active theme’s functions.php file using an FTP client and add the following code to it. first copy the code and paste it into your code editor. then it will be automattically formatted. its the most perfect way to add google fonts in WordPress.
How to Enqueue Google Fonts in WordPress the Right Way
/**
 * Enqueue scripts and styles.
 . .*/
function wpthemehat_essential_scripts() {
    // google font
    wp_enqueue_style( 'wpthemehat-fonts', wpthemehat_google_fonts() ,array(), null );
}
add_action( 'wp_enqueue_scripts', 'wpthemehat_essential_scripts',99 );


function wpthemehat_block_editor_assets( ) {
    // Add custom fonts.
    wp_enqueue_style( 'wpthemehat-editor-fonts', wpthemehat_google_fonts(), array(), null );
}

add_action( 'enqueue_block_editor_assets', 'wpthemehat_block_editor_assets' );

/*
Register Fonts
*/
function wpthemehat_google_fonts() {
    $font_url = '';

    /*
    Translators: If there are characters in your language that are not supported
    by chosen font(s), translate this to 'off'. Do not translate into your own language.
     */

    if ( 'off' !== _x( 'on', 'Google font: on or off', 'wpthemehat' ) ) {
        $font_url =  'https://fonts.googleapis.com/css2?family=Baloo+2:wght@400;500;600;700;800&family=Catamaran:wght@100;200;300;400;500;600;700;800;900&display=swap';
    }
    return $font_url;
}
Note: You will need to replace the URL with your own.
You can begin using the font you’ve just added by using your theme’s typography options (if it supports them) or by adding some code to your active theme’s main stylesheet. For instance, if we wanted to change all H2 headings to our new font, our code might look something like this:
h2 {
    font-family: 'Catamaran', sans-serif;
}
In this way it will be loaded it your actual website. if you want to add this font in your block editor then you need to add a few lines more. here it is. and remember to add this css into admin panel css.
.editor-styles-wrapper {
    font-family: "Catamaran", sans-serif;
}