Table of Contents
To install WordPress on a localhost, or your local computer, is a practical and essential step for web developers, designers, and anyone looking to create or test a WordPress website in a controlled environment. By setting up WordPress locally, you can experiment, develop, and troubleshoot without affecting your live website. In this guide, we’ll delve into the step-by-step process of installing WordPress on your localhost using XAMPP, a widely-used web development environment. Whether you’re a beginner or an experienced developer, this guide will help you get your local WordPress environment up and running smoothly.
Let’s dive in and transform your computer into a powerful web development laboratory! you can check our video if you don’t want to read blog.
Step 1: Download and Install XAMPP
Check our blog tutorial .Or you can check the video for better understanding
Step 2: Download WordPress
Step 1: Visit the Official WordPress Website
Open your preferred web browser and navigate to the official WordPress website by typing in the URL: https://wordpress.org/.
Step 2: Download WordPress
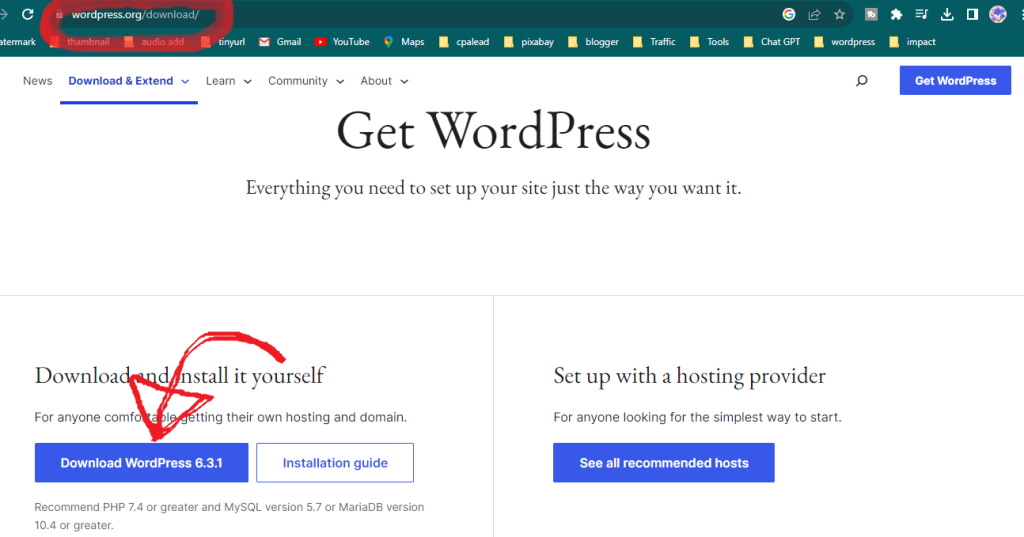
- On the WordPress homepage, you’ll immediately spot a prominent “Get WordPress” button. Click on it to proceed.!
- You will be redirected to the WordPress download page, where you will find the latest version of WordPress showcased. Right below, you will see another “Download WordPress” button. Go ahead and click it to initiate the download.!

- WordPress will be downloaded to your computer in the form of a ZIP file.
Step 3: Extract the WordPress ZIP File
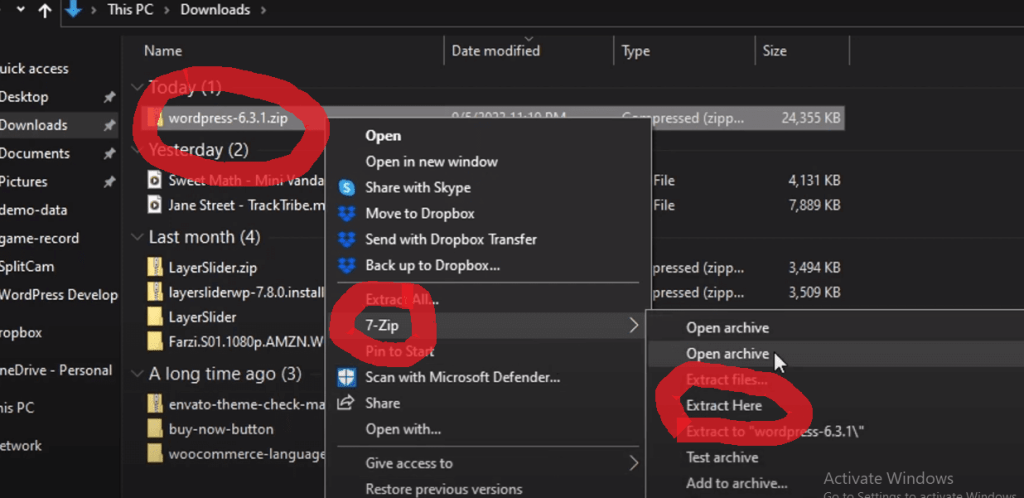
- Locate the downloaded ZIP file; typically, it will have a name like “wordpress-x.x.x.zip,” with “x.x.x” representing the version number.
- To access the WordPress files, right-click on the ZIP file (for Windows users) and select “Extract All.” If you are using macOS, you can simply double-click on the ZIP file to extract its contents.!

Step 3: Create a Database
Step 1: Access phpMyAdmin
- Open your web browser and enter the URL where phpMyAdmin is installed. This is often http://localhost/phpmyadmin if you’re using a local server like XAMPP or http://yourwebsite.com/phpmyadmin for a live server.!
- Log in using your phpMyAdmin username and password.
Step 2: Navigate to the Database Section
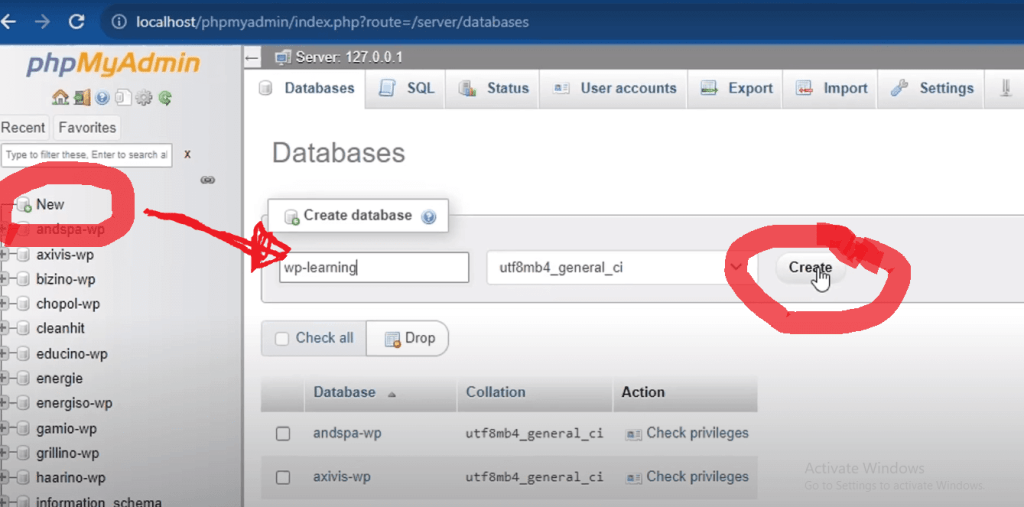
Once logged in, you’ll see the phpMyAdmin dashboard. Look for the “Databases” tab at the top and click on it.!
Step 3: Create a New Database
- On the “Databases” page, you’ll find a field to enter a new database name. Choose a name for your database (e.g., “mywebsite_db”).

After entering the name, click the “Create” button. phpMyAdmin will create the database for you.
Step 4: Verify Your Database
To ensure your database has been created successfully, look for it in the list of databases on the left-hand side of the phpMyAdmin interface.

Step 4: Install WordPress
- Extract the downloaded WordPress ZIP file to the ‘htdocs’ folder in your XAMPP installation directory (usually located in C:\xampp\htdocs).
- Rename the “wp-config-sample.php” file in the WordPress folder to “wp-config.php.”
- Open the “wp-config.php” file in a text editor and fill in the database details:
- Replace ‘database_name_here’ with the name of your database (e.g., ‘mywordpress’).
- Leave ‘username_here’ as ‘root.’
- Leave ‘password_here’ blank.
- Keep ‘localhost’ as the database host.
- Save the “wp-config.php” file.
- In your web browser, go to http://localhost/wordpress (or the folder name where you placed WordPress).
- Follow the WordPress installation instructions, including setting up your admin account and site details.
Step 5: Start the Installation
- In your web browser, go to http://localhost/wordpress (or whatever folder name you used in ‘htdocs’ if different).
- Select your language and click “Continue.”
- WordPress will inform you that it needs some database information. Click “Let’s go!”
- Fill in the database details:
- Database Name: Enter the name of the database you created (e.g., ‘mywordpress’).
- Username: Leave it as ‘root.’
- Password: Leave it blank.
- Database Host: Leave it as ‘localhost.’
- Table Prefix: You can leave this as the default ‘wp_’.
- Click “Submit” and then “Run the installation.”
Step 6: Set Up Your WordPress Site
- Enter your site information:
- Site Title: Your website’s name.
- Username: Choose a username for your admin account.
- Password: Choose a secure password for your admin account.
- Your Email: Enter your email address.
- Click “Install WordPress.”
- After installation is complete, click “Login” to access your WordPress dashboard using the username and password you set.
*Congratulations! You’ve successfully to install WordPress on your localhost. You can now start building and testing your website locally before deploying it to a live server.
Conclusion: To install WordPress is a pivotal step toward creating a dynamic and functional website or blog. This widely-used content management system provides a user-friendly platform for individuals and businesses to establish their online presence. By following the installation process, you can set up WordPress on your web server, allowing you to customize your site, publish content, and engage with your audience.
WordPress offers a plethora of themes and plugins, making it adaptable to a wide range of website types and purposes. Whether you’re a novice or an experienced developer, WordPress’s intuitive interface and extensive support community ensure that you can easily manage and expand your website’s capabilities.
However, successful website management doesn’t end with installation. Regular updates to WordPress, themes, and plugins are crucial for security and performance. Furthermore, implementing effective SEO strategies, optimizing website speed, and ensuring robust security measures are essential for creating a successful online presence.
In essence,Wordpress installation is just the beginning of your digital journey. With ongoing dedication and creativity, you can fully harness the potential of this versatile platform to achieve your online goals, whether you’re blogging, e-commerce, or building a corporate website. WordPress empowers users to create, connect, and thrive in the ever-evolving digital landscape.