Welcome to a new episode of WordPress Learning. Today we will learn how to add a blog post in WordPress. Welcome to the exciting world of blogging with WordPress! Whether you’re a seasoned blogger or taking your first steps into the blogosphere, you’ve chosen the perfect platform to share your thoughts, stories, and expertise.In this guide, we’ll take you by the hand and show you just how easy it is to add a blog post using the Gutenberg editor. Gutenberg is like your trusty sidekick, making the process of crafting beautiful and engaging blog content a breeze.If you’ve ever wondered how to put your thoughts into words, add eye-catching images, and hit that “Publish” button, you’re in the right place. We’ve got you covered. No tech jargon, no confusing instructions—just a simple, step-by-step walkthrough that will have you publishing your first post in no time. So, if you’ve got something to say or share with the world, let’s dive right in and make it happen.
Grab a cup of your favorite beverage, get comfy, and let’s embark on this blogging adventure together. Your readers are waiting, and we’re here to help you shine in the blogosphere! you can check out our video first.
Step 1: Log in to Your WordPress Dashboard Open your web browser and go to your WordPress website’s login page. Typically, it’s located at yourwebsite.com/wp-admin. Log in with your username and password.
Step 2: Access the WordPress Dashboard After logging in, you’ll be taken to the WordPress Dashboard.
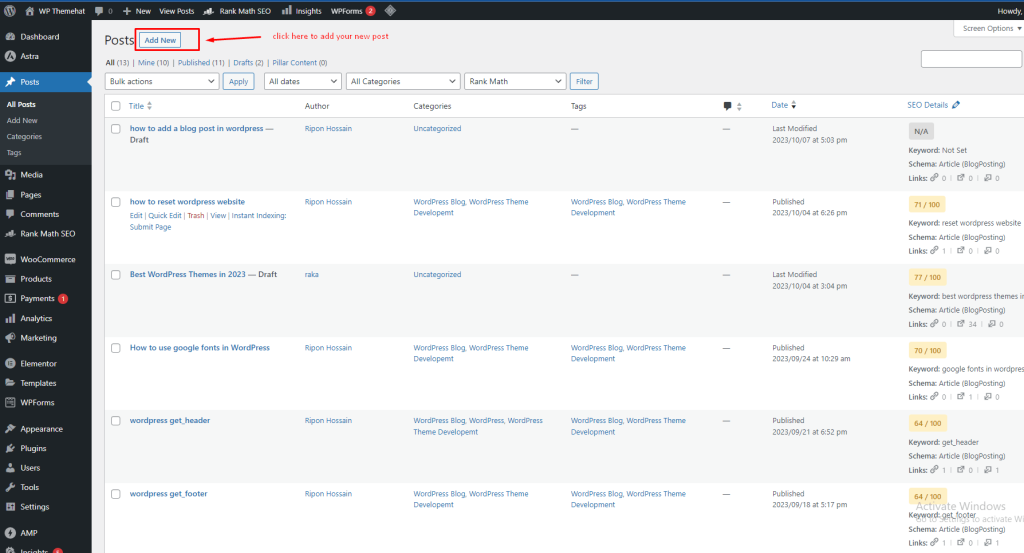
Step 3: Go to the Posts Section On the left-hand sidebar, hover your mouse over “Posts.” This will reveal a submenu. Click on “Add New.”

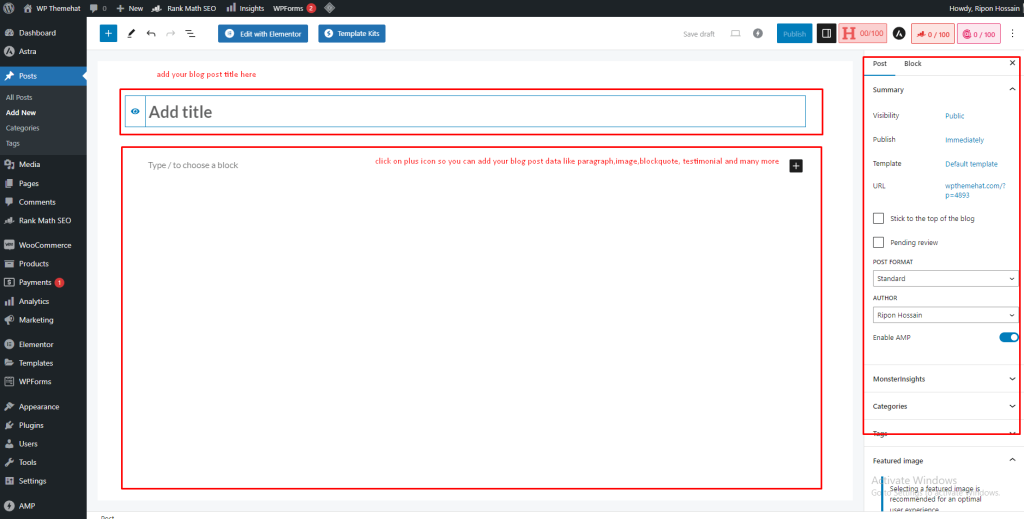
Step 4: Start Writing Your Blog Post You will be redirected to the Gutenberg editor, where you can start creating your blog post. You’ll see a blank canvas for your post. Begin by adding a title to your post in the provided field.

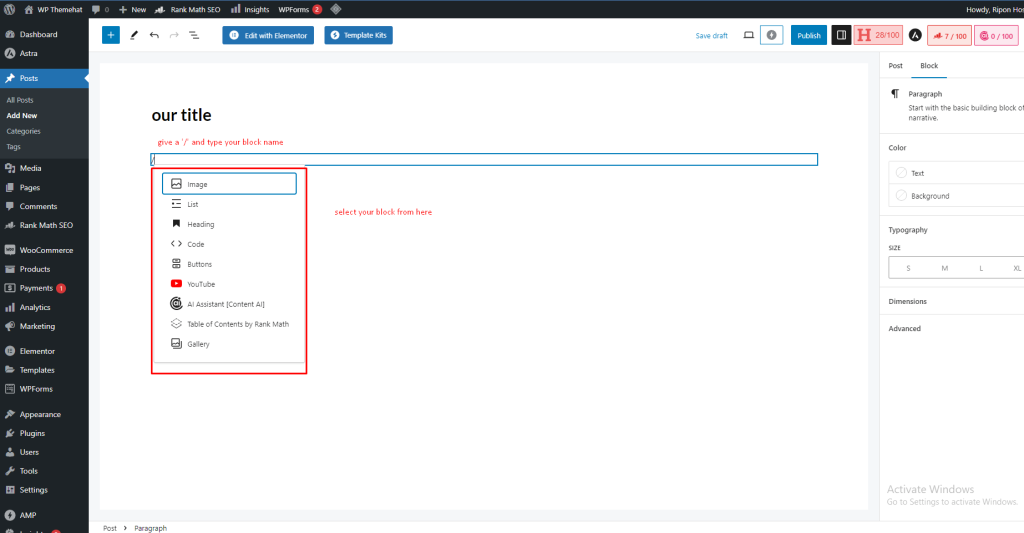
Step 5: Add Content to Your Blog Post Next, start adding content to your blog post. Use the blocks available in Gutenberg to add text, images, videos, and other elements to your post. To add a block, click the “+” button or use the slash (“/”) command and search for the type of block you want to add.

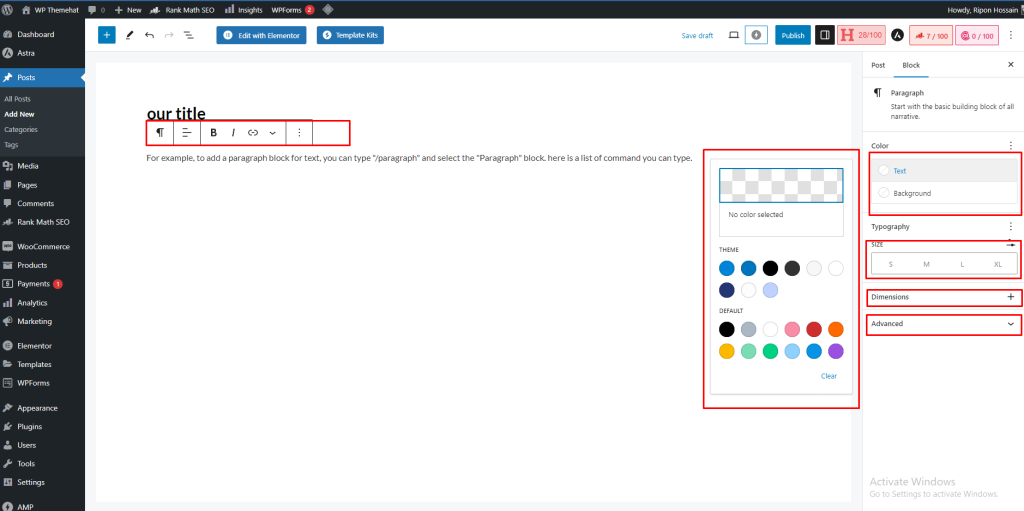
For example, to add a paragraph block for text, you can type “/paragraph” and select the “Paragraph” block. here is a list of command you can type.
- /: Opens the block inserter menu.
- /paragraph: Inserts a paragraph block for text.
- /heading: Inserts a heading block.
- /image: Inserts an image block.
- /gallery: Inserts a gallery block.
- /quote: Inserts a block quote.
- /list: Inserts a list block.
- /code: Inserts a code block.
- /table: Inserts a table block.
- /video: Inserts a video block.
- /audio: Inserts an audio block.
- /file: Inserts a file block.
- /separator: Inserts a separator block.
- /spacer: Inserts a spacer block.
- /button: Inserts a button block.
- /shortcode: Inserts a shortcode block.
- /embed: Inserts an embed block.
- /custom HTML: Inserts a custom HTML block.
- /custom CSS: Inserts a custom CSS block.
- /search: Opens the block inserter with a search bar.
- /more: Inserts a “Read More” block.
- /page break: Inserts a page break block.
- /group: Inserts a group block.
- /pullquote: Inserts a pullquote block.
- /verse: Inserts a verse block.
- /preformatted: Inserts a preformatted block.
- /text columns: Inserts a text columns block.
Step 6: Format Your Content Use the formatting options within Gutenberg to style your text, such as changing font size, bolding or italicizing text, adding links, and more. You can access these options in the block settings panel on the right-hand side.

Step 7: Add Images To add images to your blog post, use the “Image” block. Click the “+” button, search for “Image,” and select the block. You can then upload an image from your computer or choose one from your media library.
Step 8: Save Your Work As you work on your blog post, be sure to save your progress by clicking the “Save Draft” button. This will prevent you from losing your work in case of any interruptions. it will be before the publish button.
Step 9: Preview Your Post To see how your post will look to your readers, click the “Preview” button. This will open a new tab where you can view your post as it will appear on your website.
Step 10: Publish Your Blog Post Once you’re satisfied with your blog post, click the “Publish” button to make it live on your website. You can also schedule the post to be published at a later date if you prefer.
Congratulations! You’ve successfully added a blog post using the Gutenberg editor in WordPress. Your post is now live and accessible to your audience. this is the perfect way you can add a blog post in wordpress.
