We will learn how to install XAMPP in your pc. In the vast realm of web development, one essential tool stands out as the launchpad for countless digital dreams—XAMPP. Whether you’re a budding web developer or a seasoned coder looking to streamline your local development environment, XAMPP is your trusty companion. But before you can unlock its potential, you need to take the first step: the installation process. Imagine having the power to create, test, and fine-tune web applications right on your own computer. XAMPP makes this dream a reality, enabling you to craft and perfect your digital creations before they ever go live. However, the journey begins with mastering the art of XAMPP installation—a gateway to a world of web development possibilities. In this comprehensive guide, we’ll take you on a step-by-step journey through the XAMPP installation process on your Windows computer. Whether you’re a total novice or a coding enthusiast eager to enhance your skills, this blog is your roadmap to success. We’ll demystify every aspect of the installation, from downloading XAMPP to configuring its components, all while ensuring your web development environment is secure and optimized. So, fasten your seatbelt and get ready to embark on a journey that will empower you to create and innovate in the ever-evolving landscape of web development. By the end of this guide, you’ll be well on your way to harnessing the full potential of XAMPP, unlocking a world of digital possibilities right at your fingertips.
Let’s dive in and transform your computer into a powerful web development laboratory! you can check our video if you dont want to read blog.
Step 1: Download XAMPP
Downloading XAMPP is the first step towards setting up a robust web development environment on your Windows computer. XAMPP provides the necessary tools, including Apache, MySQL, PHP, and more, to create and test websites and web applications locally. In this guide, we’ll walk you through the process of downloading XAMPP for Windows.
Step 1: Visit the Official XAMPP Website

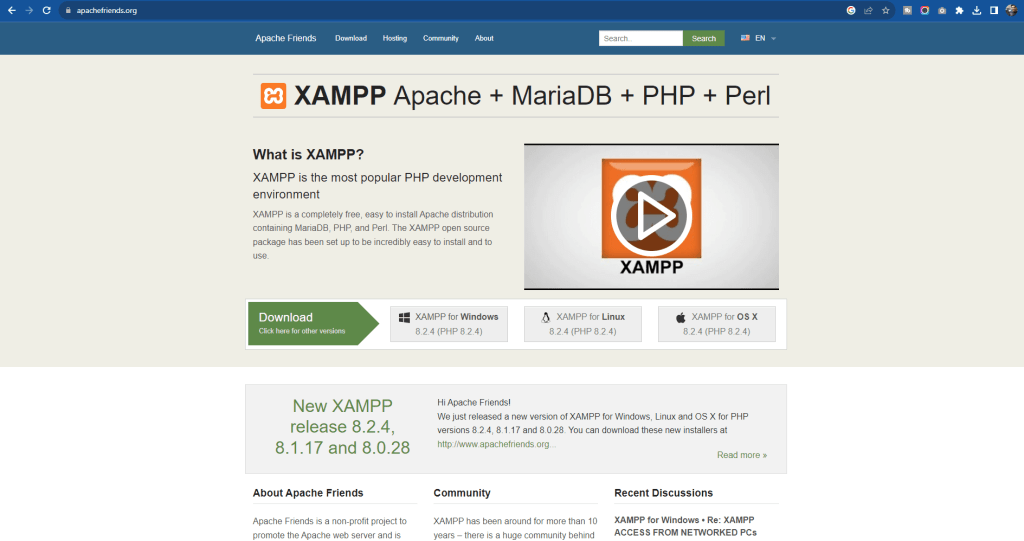
The official XAMPP website is the safest and most reliable source for downloading XAMPP. Open your web browser and go to https://www.apachefriends.org/index.html. On the XAMPP homepage, you’ll see different versions available for download. Select the version that suits your needs. For most users, the latest stable version is the best choice. Click on the download button next to your chosen XAMPP version. This will initiate the download process. While the download is in progress, consider where you want to install XAMPP on your computer. By default, it’s installed in the C:\xampp directory, but you can customize the installation location during the installation process. The download may take a few minutes, depending on your internet connection speed. Please be patient and let it complete. Once the download is finished, you’ll see a notification indicating that the download is complete. You are now ready to proceed with the XAMPP installation process.
Step 2: Run the Installer
Now that you’ve downloaded XAMPP, the next step is to run the installer and begin setting up your local web development environment. In this guide, we’ll walk you through the process of running the XAMPP installer on your Windows computer.
Step 1: Locate the Installer: After the download is complete, navigate to the folder where you saved the XAMPP installer file (e.g., xampp-windows-x64-VERSION-installer.exe). Typically, you’ll find it in your computer’s Downloads folder.
Step 2: Run the Installer: Double-click on the XAMPP installer file to run it. Windows may prompt you with a User Account Control (UAC) dialog to confirm that you want to make changes to your system. Click “Yes” to proceed.
Step 3: Welcome Screen: The XAMPP installer will launch, and you’ll see a welcome screen that introduces the installation process. This screen provides you with essential information about XAMPP.
Step 4: Choose Installation Language: Select your preferred installation language from the dropdown menu. This ensures that the installer’s interface will be in the language you’re comfortable with.
Step 5: Start Installation: Click the “Next” button to start the installation process. XAMPP will now copy the necessary files to your chosen installation directory (usually C:\xampp).
Step 6: Installation Progress: You’ll see a progress bar indicating the status of the installation. This process may take a few moments to complete, so please be patient.
Step 7: Complete Installation Once the installation is finished, you’ll receive a confirmation screen. Congratulations! You’ve successfully run the XAMPP installer on your Windows computer.
Running the XAMPP installer is a crucial step in creating your local web development environment. With the installation complete, you’re ready to configure and start using XAMPP for web development and testing.
Step 3: User Account Control (UAC) Prompt
During the XAMPP installation on your Windows computer, you may encounter the User Account Control (UAC) prompt. This security feature in Windows ensures that you authorize any changes or installations that could affect your system. In this guide, we’ll explain what the UAC prompt is and how to handle it during the XAMPP installation process. When you double-click the XAMPP installer to run it, Windows may display the UAC prompt. This prompt seeks your permission to allow the installer to make changes to your computer. It’s an important security measure to prevent unauthorized or malicious installations.
- Read the Prompt: Take a moment to read the UAC prompt message carefully. It should mention the application name (in this case, the XAMPP installer) and request your permission to make changes.
- Verify the Publisher: Check the name of the publisher to ensure it’s legitimate. In the case of XAMPP, it should be verified as an application from Apache Friends.
- Click “Yes”: If you initiated the XAMPP installation and trust the source, click “Yes” to allow the installer to proceed.
- Password Prompt (Optional): In some cases, Windows may ask for an administrator password or prompt you to confirm your identity if you have administrative privileges. Provide the required information if prompted.

The UAC prompt ensures that you have control over what gets installed on your computer, reducing the risk of unintended or potentially harmful changes. It’s a critical security layer in Windows.
Step 4: Select Components
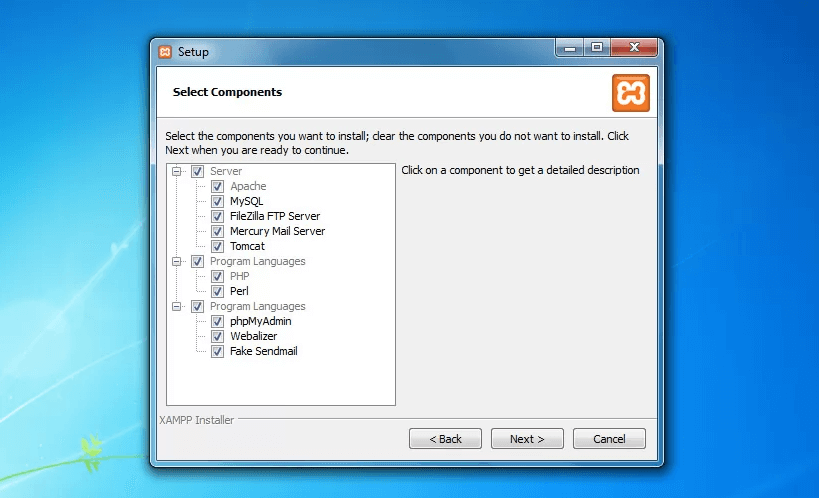
You’ll see a window asking you to select the components you want to install. The default selection includes Apache, MySQL, PHP, and phpMyAdmin, which are essential for web development. You can leave these selected or customize your installation by checking or unchecking components.

Step 5: Choose Installation Folder
The installation folder is where all XAMPP files and components will be stored. It’s important to choose a location that suits your preferences and needs. Here’s why it matters:
- Default Location: By default, XAMPP is installed in
C:\xampp. This is suitable for most users, as it keeps everything in one place. - Customization: You can choose a different directory if you prefer to store XAMPP elsewhere on your computer, such as on a different drive or partition.
Choose an installation folder that you can easily access and remember. Ensure that the selected location has enough disk space for XAMPP and your web development projects.
Step 6: Start Menu Shortcuts
Choose whether you want to create shortcuts in your Start Menu. It’s recommended to leave the default settings as they are.
Step 7: Bitnami for XAMPP (Optional)
You may be asked if you want to install additional software like Bitnami for XAMPP. This is optional, and you can uncheck it if you don’t need it.
Step 8: Install XAMPP
Click the “Install” button to start the installation process. XAMPP will copy the necessary files to the chosen installation folder.
Step 9: Firewall Warning
As you proceed with the XAMPP installation on your Windows computer, you may encounter a Firewall Warning. This warning ensures that you grant the necessary permissions for XAMPP components to communicate through your computer’s firewall. In this guide, we’ll explain what the Firewall Warning is and how to handle it during the XAMPP installation process. The Firewall Warning notifies you that XAMPP components, such as Apache and MySQL, need access through your Windows Firewall to function correctly. It’s crucial for proper operation and connectivity.
- Read the Warning: Carefully read the Firewall Warning message. It typically mentions the applications (e.g., Apache and MySQL) that require access through the firewall.
- Click “Allow Access”: To grant the necessary permissions, click the “Allow Access” or similar button, depending on the wording of the warning. This action ensures that XAMPP components can communicate without interruptions.
- Confirm Action: If prompted by Windows, confirm your choice to allow access to these components.
Allowing access through the firewall ensures that XAMPP can function as intended. It allows your web server, database, and other components to interact with each other and with external services as needed.
Step 10: Complete Installation
Congratulations! You’ve successfully navigated through the various installation steps, and now it’s time to complete the XAMPP installation on your Windows computer. In this guide, we’ll walk you through the final stages and what to do once the installation is finished.
- Installation Progress: Wait for the installation progress bar to reach 100%. This indicates that all necessary files have been copied to your chosen installation folder.
- Installation Complete: You will see a confirmation screen notifying you that the installation is complete. This screen typically includes a “Finish” or similar button.
- Start Control Panel: Click the “Finish” button to exit the installer. You can now start using XAMPP.
Step 11: Start XAMPP Control Panel
- XAMPP Control Panel: To begin using XAMPP, open the XAMPP Control Panel. You can do this by navigating to the installation folder (e.g.,
C:\xampp) and runningxampp-control.exe. - Start Apache and MySQL: In the XAMPP Control Panel, you’ll see options to start Apache and MySQL. Click the “Start” button next to each component. This action initiates the web server (Apache) and the database server (MySQL).
- Access localhost: Open your web browser and type
http://localhostin the address bar. If everything is set up correctly, you should see the XAMPP welcome page, indicating that your installation is working as expected.
Completing the XAMPP installation marks the final step before you can begin using this powerful web development environment on your Windows computer. By following these simple steps, you’ve successfully installed XAMPP and can now explore its capabilities for web development and testing.
Step 12: Start Apache and MySQL
In the XAMPP Control Panel, start the Apache and MySQL services by clicking the “Start” button next to their names.
Step 13: Access localhost
Open your web browser and go to http://localhost to confirm that your XAMPP installation is working correctly. You should see the XAMPP welcome page.
Step 14: Test PHP
To test PHP, create a simple PHP file (e.g., test.php) in the htdocs folder inside the XAMPP installation directory and access it through your browser (e.g., http://localhost/test.php). Use a text editor like Notepad to create the PHP file with some PHP code (e.g., <?php phpinfo(); ?>) and save it in the htdocs folder.
That’s it! You’ve successfully installed XAMPP on your Windows computer, and you can now start developing and testing web applications locally.
